I want to say hello and thank you to everyone who has read my blog! I now have an email address that you can use to ask me questions or send me recipe ideas. Some of you already get an email when I update my blog, but if you haven't yet, send me an email asking for updates. That way I can add your email address to the list.
someoneinthekitchenwithdinah@yahoo.com
Eat, drink, and be Merry!
~Dinah
Thursday, October 8, 2009
Sunday, October 4, 2009
Caprese Salad Kabobs
 Caprese salad is traditionally tomatoes, mozzarella cheese, and basil with a bit of olive oil and salt and pepper. Sometimes they are made into stacks or fanned out alternating on a plate . I decided to make mine into kabobs. This makes them easy to prepare ahead of time for guests, does not require utensils, and they are pretty.
 What to use:
wooden skewers
marinated fresh mozzarella cheese
grape tomatoes
fresh basil
 What to do:
1. Prep the tomatoes and basil by washing them both. Pat dry the basil leaves with a towel so get the moisture off it it. Pick some of the small leaves and put aside for the kabobs or tear the larger leaves into smaller pieces. I also dumped the cheese into a strainer to drain them of the marinade.
2. Decide on a pattern for your kabobs, or just make them random. But a pattern helps with an assembly line. I started with 2 tomatoes on each one, then basil, cheese, basil, and 2 more tomatoes.


4. Arrange them on a platter, and before serving drizzle with a bit of balsamic vinegar if you'd like. It adds a great flavor!
Tips:
*I used the mini mozzarella balls, since they are easy to skewer and less work. You could easily buy a larger piece of fresh mozzarella in water and cut in into cubes.
Thursday, October 1, 2009
Birds in a Nest (Eggs in Toast)

This is one of my favorite things to make for dinner. Yes, I said dinner, but breakfast for dinner is quick, easy, and delicious! It also looks cool.
What you need for 2 servings...or one if you are me:
2 eggs
2 pieces of wheat toast
butter
seasoning (I used one with everything in it, but salt and pepper are fine too)

What you do:
1. Heat a pan on medium heat. Add a pat of butter to melt while you are preparing the bread.

2. To prepare the bread, use a round biscuit cutter or a glass to cut a hole out of the center of each piece of bread.

3. Butter the bread on both sides then place inside the pan.

4. Crack one egg into each hole in the bread. Let cook a few minutes on each side, depending how runny you want the yokes. Be careful when you flip them, sometimes they stick to the pan.

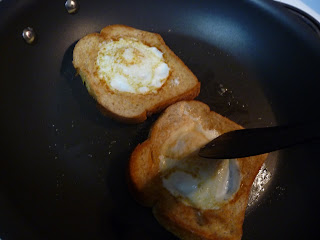
5. Season to your liking and enjoy!


Tips:
*If you are cooking bacon or sausage too, use a bit of the grease from that instead of butter in the egg pan. This adds a bit more flavor.
*The circles of bread that are left over make a good small sandwich for little ones, or toast.
*If you are nervous about cracking the egg directly into the middle of the bread, crack the egg into a bowl first then slowly pour it into the middle of the bread.
Wednesday, September 30, 2009
Taco Soup

This dish was inspired by my friend Vicky at work. Her husband made this great lunch one day which she called Taco Soup. It was delicious, so I couldn't resist trying it myself, knowing that I had most of the ingredients at home. It didn't taste the same, but sure was tasty. So here is my try at Taco Soup (although its more like a taco chili, but Taco Soup is more fun to say.)
What I used:
1 lb ground beef
1/2 small onion, chopped
1 garlic clove, minced
1 palm full each of chili powder and cumin
Salt and pepper to taste
1 can each of corn and pinto beans, drained
2 cans stewed tomatoes - one was Mexican style with chilies in it
Tortilla chips
Sour cream
Shredded cheese
What I did:
1. I started by heating a skillet on high heat and then browned the beef, crumbling it up as it cooked.

2. I then added the chopped onion and garlic and let it cook to soften. When the meat was almost done, I drained out some of the grease with a spoon.


3. The chili powder, cumin, salt, pepper were added next, stirring to combine.

4. Once the meat was cooked through, I added all of the cans. Everything was mixed together and simmered for a few minutes until heated through. Make sure you taste it at this point. Add more spices if needed.

5. To serve, I ladled some of the soup into a bowl and mixed in the cheese and sour cream. Then it was topped off with chips. Yummy!
Friday, September 18, 2009
Margarita Cupcakes
I wish I could take credit for these, but I can't. I can however say that they were delicious!! And people loved them. I decorated mine with a lime slice and green sugar on the rim. Unfortunately, I didn't take a picture at the time but will be making them again soon so I'll do it them. In the meantime, enjoy the recipe from Good Things Catered.
Friday, July 24, 2009
Bruschetta Pasta

If you can make bruschetta, you can easily make this pasta dish. All you do is make the bruschetta and cook the pasta. When the pasta is done toss it with the bruschetta and top with Parmesan cheese. So simple and so fresh on hot summery days.
The bruschetta recipe can be found under Bruschetta Burger here. I've included some pictures with some tips on how to prepare this and for general knowledge of tomatoes and basil.
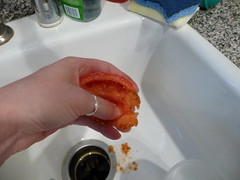
I cut the tomatoes in half first and seed them by pushing my thumb into the tomato and scraping out the seeds. This gets some of the extra liquid out too
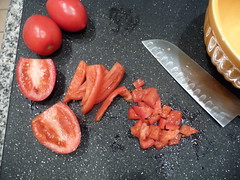
With Roma tomatoes, I like to slice them lengthwise first, them turn them sideways and dice them. Really, it doesn't matter, just make sure you have a nice sharp knife.As a side note, that knife is my all-time favorite. It's a 7-in Hollow edge Wusthof Santoku knife which allows air to get in between the food and blade so you can cut thin slices. It is also very easy to hold, even though it can look intimidating to a novice chef.

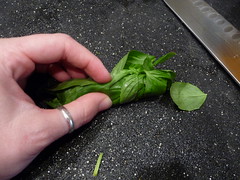
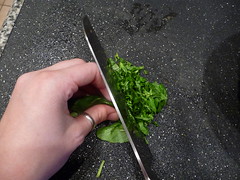
Wash the fresh basil and pat dry with a towel. Then start by rolling it into a log. If you have big leaves its easier to pile them all on top of each other before rolling. Unfortunately I did not, so I just took the pile and rolled. Once it's rolled, start chopping the basil and making thin strips to cut. When you are finished you will have little ribbons of basil.
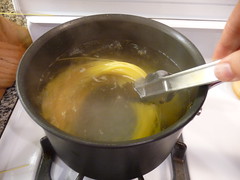 As far as cooking pasta...always put a lid on the water while you wait for it to boil and always turn the heat ALL the way up. It does boil faster!! Once it is boiling rapidly, take the lid off and add a good amount of salt--more than a pinch. You are flavoring the pasta while it cooks, so just a dash won't do much. Italians like their pasta al dente, which means there is a slight bite to the pasta and it's never mushy. If you follow the time on the box, its usually right. My rule of thumb is that I always start with 8 minutes (6 for angel hair or anything tiny). Then I taste it and decide to drain it or leave it for another minute or two.
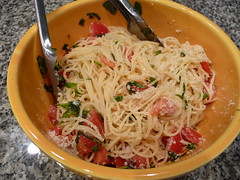
To finish the dish, ladle a couple spoonfuls of the starchy pasta water into the bruschetta and stir. This helps the sauce attach to the pasta. Then toss in the drained pasta and mix together. I always top my pasta with Parmesan cheese. That's it, pasta and sauce in no time!
Thursday, July 23, 2009
Top 20 at Trader Joe's
Ok, so some of you may know I LOVE Trader Joe's! But for those who don't, I would shop there everyday if I could. I think some people are mislead with the idea that Trader Joe's is expensive. Well I want to let those people know that it's not, mostly. Yes, some of the completely natural/organic items, especially the meats, will be pricier but you are getting a different quality than say something of a similar type from WinCo. And yes, I love WinCo, too! Each store has different things I buy at each so I must frequent both.
So back to Trader Joe's. I am learning that I do eat pretty healthy most of the time, especially when I am cooking myself. If I don't buy the cookies/cakes/fattening foods for my home, I don't eat them at home. Most of the food at Trader Joe's is healthy. I did say MOST not ALL. Everything in moderation right? And healthy food can be tasty food when you add herbs and spices to them.
So here is a list of things I buy at Trader Joe's almost every time I go:
1. Bananas-always 19cents per banana, but my son and I eat one almost every day, so I always need them
2. Flax Seed plus Pumpkin Granola-the best ever! less than $3/box, its great on its own with milk, but I also like to make a parfait with Greek yogurt, granola, and fresh fruit.
3. Grated Parmesan/Romano Cheese blend-usually between $3.50-$4.50/container depending on the size, great blend of both cheeses for pasta or to mix into ingredients. It is a lot, so I keep mine in the freezer to prevent it from molding, and you don't even have to put it into another container.
4. Mache (said like "mosh")- usually $2.99 in the lettuce section, makes great salads! Way cheaper than buying it at Raley's or Safeway. It is great with a vinaigrette dressing since it is a delicate leaf.
5. Hummus-Original flavor is my favorite, but others are yummy too! Makes a great dip for veggies, pitas, crackers, root vegetables chips (see below), or a spread on a sandwich instead of mayo. Easy to use as an appetizer too.
6. No Pudge Brownie Mix-has a pink pig on the front-excellent for a low fat brownie mix because it has a recipe on the side to make 1 serving! Perfect for those late-night chocolate cravings!
7. Creamy Tomato Soup-less than $3/carton. Great texture and flavor, makes an easy dinner with grilled cheese!
8. Dried mangoes-unsweetened and unsulfered, so yummy that I usually buy 2 bags. There is a sweetened one too which is good if you want more sugar.
9. Nuts-chopped, sliced, roasted. Whatever kind you need, they have them cheaper than most stores. Store in the freezer so you always have them on hand.
10. Milk-cheaper than the regular grocery stores, and I always need it.
11. Trader Joe's Whole Milk Yogurt-6 individual sizes. I buy these for my son who needs the fat and calories. It's $2.99/6 servings, much cheaper than the baby brands at the grocery stores.
12. Trader Joe's jarred Tomato and Basil Marinara Sauce-again less than $2/jar and tastes homemade. It's a great base too for adding your own ingredients like ground beef.
13. Pomegranate Green Tea-very refreshing and only 80 calories a serving, plus the green tea is good for you!
14. Chocolate Covered Orange sticks...I have no idea what the real name is, but they are on the shelves above the frozen food. Such a great treat, the dark chocolate and the orange flavored jelly inside. YUM! However, I cannot buy these all the time, I'll eat them too quickly!
15. J.W.Morris Wine-all $2.99/bottle. Forget 2 buck Chuck, this is much better in my mind. They make every kind you can think of but my two favorites are the Riesling (very sweet white wine) and the Gewurztraminer(a nice white wine sweeter than Chardonnay but not too sweet)
16. Pumpkin Butter (now found year round!) - this is delicious! It's almost like a jam or spread. I would eat it for a snack or breakfast. First I would spread some Cheve cheese (goat cheese) onto toast and then top with the Pumpkin Butter. It's heaven. This would be a good appetizer also.
17. Basil plant - for about $3 there are enough leaves on this plant to make 2-3 jars of fresh pesto. You can find a recipe for pesto sauce at an older post for "Bruschetta Burgers." This is also a seasonal item, mostly summertime.
18. Frozen food- there is not one specific thing I religiously buy in this section, but it's always worth a look. There are lots of pre-made frozen meals, for one, or in a bag, that taste great and are not as processed. When cooking for 1 or 2, these make it a lot easier. Some good ones to try - fried rice, mini pizzas, pot stickers, eggplant Parmesan cutlets, teriyaki chicken, gnocchi, vegetable bird nests...the list could go on. Newest one I found is a Thai soup...so yummy and flavorful! I can't remember what it actually is though, I'll keep you posted.
19. Heirloom Tomatoes- during the summer mostly, these tomatoes are delicious. Usually come in a variety box of different sizes and colors including green, orange, and yellow. I like to slice them and top them with balsamic vinegar.
20. Flowers - I'd be waiting a long time if I waited for someone else to buy me flowers, so I buy them for myself! And Trader Joe's has a great selection all year long. Most of the time there is some pretty bouquet for under or around $5. Perfect to brighten up your home.
Wednesday, July 22, 2009
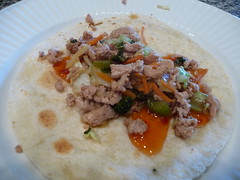
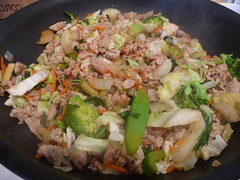
Stir-Fry Burrito
This is a simple dinner to make. There is not too much cooking to do here so it comes together very quickly. It also has lots of veggies, so it's healthier than a regular bean and cheese burrito. Although those are good too, everything in moderation right?
What I used:
1 lb of ground
1 package of frozen stir fry veggies (Trader Joe's brand is what i had)
Montreal Steak Seasoning to taste
Flour tortillas
Sweet Chili Sauce (found in the Asian foods aisle)
What I did:
1. I started by browning the turkey meat in medium high heat breaking it up with a wooden spoon as it cooked. When it was mostly cooked, I seasoned it with the Montreal Steak Seasonings.
2. I added in the frozen veggies along with about 1/4 cup of water. Then I put a lid on the pan and let the veggies steam a bit while the turkey continued to cook as well. This should take about 5 minutes. Once the veggies were almost done, I took the lid off to let some of the water evaporate and the mixture to brown a bit.
3. While the turkey/veggie mixture was finishing up, I heated some flour tortillas on a warm skillet to brown. Once the tortilla was done, I spread on some of the Sweet Chili sauce.
 4. Spoon on some of the turkey/veggie mixture onto the tortilla, wrap up and enjoy your burrito!
 Tips:
Tips:
*When browning tortillas, use a high heat. Just don't forget them on the skillet or they will burn.
*I don't have the tolerance for spicy food, but the Sweet Chili Sauce is very mild.
*To mix it up a bit, mix the chili sauce with sour cream. This makes a great sauce for burritos too.

What I used:
1 lb of ground
1 package of frozen stir fry veggies (Trader Joe's brand is what i had)
Montreal Steak Seasoning to taste
Flour tortillas
Sweet Chili Sauce (found in the Asian foods aisle)
What I did:
1. I started by browning the turkey meat in medium high heat breaking it up with a wooden spoon as it cooked. When it was mostly cooked, I seasoned it with the Montreal Steak Seasonings.
2. I added in the frozen veggies along with about 1/4 cup of water. Then I put a lid on the pan and let the veggies steam a bit while the turkey continued to cook as well. This should take about 5 minutes. Once the veggies were almost done, I took the lid off to let some of the water evaporate and the mixture to brown a bit.
3. While the turkey/veggie mixture was finishing up, I heated some flour tortillas on a warm skillet to brown. Once the tortilla was done, I spread on some of the Sweet Chili sauce.
*When browning tortillas, use a high heat. Just don't forget them on the skillet or they will burn.
*I don't have the tolerance for spicy food, but the Sweet Chili Sauce is very mild.
*To mix it up a bit, mix the chili sauce with sour cream. This makes a great sauce for burritos too.
Friday, June 26, 2009
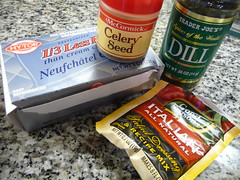
Cucumber Sandwiches
 Mmmm yum! I love these sandwiches! Quick, easy, and can be made the night before . My mom got this recipe from my god-mother and used to make these as hors d' oeuvres for company on little rye breads, but I prefer a regular sized sandwich for lunchtime.
What to use:
1/3 Less fat cream cheese (also called Neufchâtel cheese)Packet of Italian dressing seasoning mix
Dried dill
Dried celery seeds
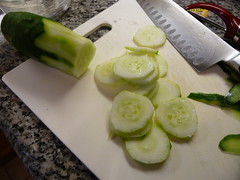
Cucumber
Bread slices of your choice (I had whole wheat)
What to do:
1. Peel and slice the cucumber-about 1/2 fits nicely on regular sandwich bread.
1. Peel and slice the cucumber-about 1/2 fits nicely on regular sandwich bread.

2. In a bowl, spoon in some cream cheese, however much you feel should cover your sandwich-I used about 2-3 tablespoons. Add a few shakes of the dill and celery seed, and about a dime sized amount of Italian seasoning mix (for this amount of cream cheese). Mix it well to combine. Here you need to taste it to see if it needs more of something. If you feel you put too much seasoning, add more cream cheese.


3. Next, spread the cream cheese mixture on both sides of the bread, so that the cucumbers have something to hold on to. Lay the cucumber slices on top of the cream cheese filling up each side. Then sprinkle more dill all over the two sides.
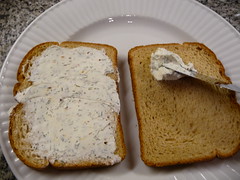
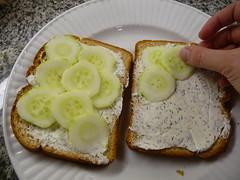
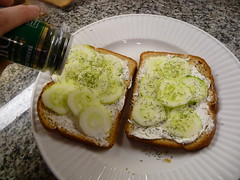
4. Put one slice on top of the other and cut in half to enjoy! If you are making this the night before, wrap in plastic or foil and refrigerate.

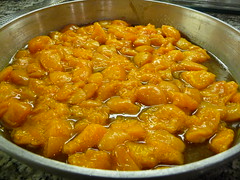
Apricot Upside-Down Cake

Summer fruit is my all-time favorite! My grandmother used to have an enormous apricot tree that gave the best-tasting apricots. Every year she would make jam, and my dad would make pie. A coworker of mine has some extra apricots, and I said I would make something if he brought them in. So, this is my version of a Better Homes and Garden Pineapple Upside Down Cake, using apricots. It was delicious-definitely a crowd-pleaser!
**The apricot recipe is enough for 2 upside-down cakes. You will need to double the cake recipe below if you want to make 2 cakes.
Apricots:
This was not a real recipe, but something I made remembering what apricot pie filling kind of tasted like. So this is what I came up with to use on the bottom of the cakes instead of canned apricots. I used about 2 pounds of apricots for this recipe, eye-balling how much I would need to cover 2 9-inch cake pans. If you only make one cake, you would obviously need fewer apricots. However, you could always save the rest of the cooked fruit for other things, like topping ice cream or cottage cheese.
1. Heat a large sauce pan over medium-high heat and add a couple pats of butter to melt. Chop the apricots into bite-size pieces and add to the pan.

3. Let the apricots simmer and cook away for about 10 minutes until they are soft.


Cake:
The parts that are in italics are the pieces of the recipe that I altered from the original. The rest of the recipe is taken from the Pineapple Upside-Down Cake recipe from the Better Homes and Gardens Cookbook 75th Anniversary Edition, page 164. Some things have been left out of the original as well.
Oven: 350*F
Bake : 30 min
Makes: 1 9-inch cake or 8 servings
2 tbsp butter
1/3 c packed brown sugar
1 tbsp water
1 1/3 c all purpose flour
2/3 c granulated sugar
2 tsp baking powder
1/8 salt
1/3 c milk
1/3 c juice from the apricots cooked beforehand
1/4 c butter, softened
1 egg
1 tsp vanilla
1. Melt the 2 tbsp butter in a 9-inch cake pan. Stir in the brown sugar and 1 tbsp water. Add in enough cooked apricots to cover the entire bottom of the pan. Set pan aside.

Wednesday, June 17, 2009
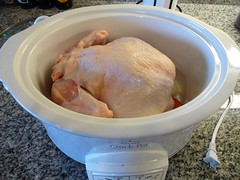
Easy Crock-Pot Chicken
 This is considered a staple in my house. I cook a whole chicken in the crock pot over night, or during a lazy Sunday, and then freeze the shredded meat. The chicken is ready to use in pastas, salads, quesadillas, enchiladas, sandwiches, soups and anything else you can imagine. I just take out what I need and thaw it on the counter or in the microwave. It's cheap, easy, and makes last-minute dinners without having to get fast-food.
Ingredients:
1 whole chicken
3-4 carrots
3-4 celery stalks
1 medium to large onion
Salt/pepper
Poultry seasoning
Garlic powder
2-3 bay leaves
Liquid of your choice-water, chicken or vegetable broth, white wine
Directions:
1. Chop up the carrots, celery, and onion. Everything should be quartered so that it lasts through the long cooking process.

2. Prepare the chicken in a clean sink by removing the innards and any extra fat that is visible around the end openings. You don't have to do this, but it just grosses me out and unnecessary. Rinse the chicken under running water, inside and out, and then pat dry with paper towels. Place inside the crock pot.
3. Sprinkle the chicken with the salt, pepper, poultry seasoning and garlic powder. Make sure each spice gets all over, around and inside the chicken.
4. Add a few pieces of each vegetable underneath the chicken so it is sitting on them. Then toss a few pieces of each inside the cavity of the chicken as well. The remaining veggies put on top of the chicken. Throw the bay leaves on top.
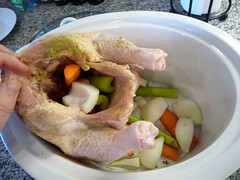
5. Add enough liquid to fill the crock pot about half way. It should cover at least half of the chicken. If you are using wine, I suggest doing half wine and half water or broth.
6. Place the lid on the crock pot and set for your longest cook time; mine gets set on Low for 8 hours.

7. When the chicken is done, the meat should fall off the bones. Depending on the size of the chicken, this might not take all 8 hours. Remove the chicken from the crock pot, leaving the liquid inside the pot.
8. Shred the meat with two forks (just like in the Pulled Pork recipe from a previous post) or leave in pieces and place in a freezer bag. Label the bag with a Sharpie marker so you know when it was made and what it is and freeze. You're done and ready to begin making lots of easy quick meals for the next month or so.
Tips:
*I usually buy 2 whole chickens at a time-one to freeze, and one to cook-so I always have this on hand. Its the easiest thing to do last minute, and it cooks while you are sleeping or at work!
*Season the chicken however you like- use cumin and chili powder if you want a more Tex-Mex flavor, or add fresh herbs and lemon when you have them on hand.
*Be sure to clean everything really well when handling raw chicken. I usually take the lids off of all my spices before I use them so I can hold the chicken in my left hand and sprinkle with my right. This way I don't have to constantly wash my hands and nothing gets contaminated. Don't forget to clean out the sink if you prepared the chicken in there.
Subscribe to:
Comments (Atom)