The inspiration for this burger was one I ate at Applebee's once. It was amazing, and I figured I can make my own version at home. The pesto sauce and bruschetta can be used separately too, but put together with the burger, OH WOW! It's heaven on bread!
As a side note, when I cook, I don't always use exact measurements. I remember once watching my grandma cook a family recipe so I can actually have it written down. But it was a lot of "oh about this much salt" and "just throw in some bread crumbs" with no exact science to it. It took me awhile to be confident to do the same, but with practice, it got easier. So, taste your food as you cook it and adjust where you feel you need to. You will soon start to see how much or how little salt you like, or where you feel you need to add something else. You should like the food you cook, so personalize it!
Pesto Sauce 
2 Cups basil leaves
1 cup olive oil
1 tsp salt
1/2 tsp ground pepper
1/2-1 tsp crushed garlic
Put all ingredients into the blender and puree until smooth. Pour into a glass jar and keep in the refrigerator. You can also freeze it for up to 6 months. Use it on pasta, rice, over chicken, in a sandwich, or the yummiest burger ever!
Bruschetta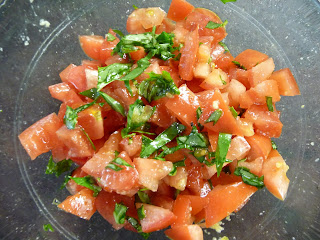
4-5 Roma tomatoes
2-4 basil leaves
1/2 - 1 tsp crushed garlic
Salt and pepper to taste
Chop the tomatoes and basil, toss together in a bowl. Drizzle in some olive oil, add salt and pepper to taste and the garlic. Taste. Add more seasonings is you like, but remember that garlic will get stronger once it sits around. I like to make this, then chill it. Before using it, I taste it and add more seasoning if needed. If you think its too salty, add more tomatoes and oil.
Bruschetta Burgers
Patty:
1-1 1/2 lbs Ground sirloin
1-1 1/2 tsp Montreal Steak Seasoning
1 tsp Crushed garlic
4-5 shakes of Worcestershire sauce
a handful of Parmesan cheese
For assembling:
Ciabatta rolls
Olive oil
Garlic powder
Pesto sauce
Bruschetta
Fresh mozzarella cheese- this is the kind usually in water or vacuum sealed, Precious brand is always good.
Put all of the ingredients for the patties in a bowl. Mix with your hands until everything is combined. Then form patties to the size you prefer, keeping in mind the size of the bread so it fits nicely. I found that making them thinner makes eating it easier once inside the bun. Grill the patties on the barbecue or inside on a grill pan to your liking. While the patties are cooking, brush each side of the rolls with olive oil and sprinkle on a bit of garlic powder. Toast them in the oven or on the grill until golden. When the patties are almost done, place a slice of the mozzarella cheese on each one so that it melts.
Now it is time to finish the burger. Add pesto sauce to one or both sides of the rolls. Place a patty on the bottom half of the roll. Top the patty with some of the bruschetta, and then add the other half of the roll. Stare at it a minute to admire your wonderful creation! Then dig in!
Tips:
*Keep in mind the size of the bread when forming the patties, so it fits nicely. I found that making them thinner makes eating it easier once inside the bun.
*You can heat the pesto up in the microwave or on the stove if it was sitting in the fridge for awhile.
*I found that using a brush is the easiest way to get the pesto on the bread. It really gets it into the nooks and crannies. I like to use cheap wooden paintbrushes from the hardware store, the last forever and can be put into the dishwasher.